Google Sign-In is the far most popular social login feature that websites seek to authorize users. Almost every person that uses the internet, is using either of Google services. Hence it becomes a must to add Google Sign-In into your PHP website. It allows maximum users to log in and be your customers through a social service they are familiar with.
In this series, we’re applying a common solution to add all social logins into one integration. However, we need to register an app or project to each individual provider’s interface. We’ve already created one for Facebook as explained in the article. Here, we are setting up a Google project to add social login/register through it.

Add Google Sign-In – All in One Social Login
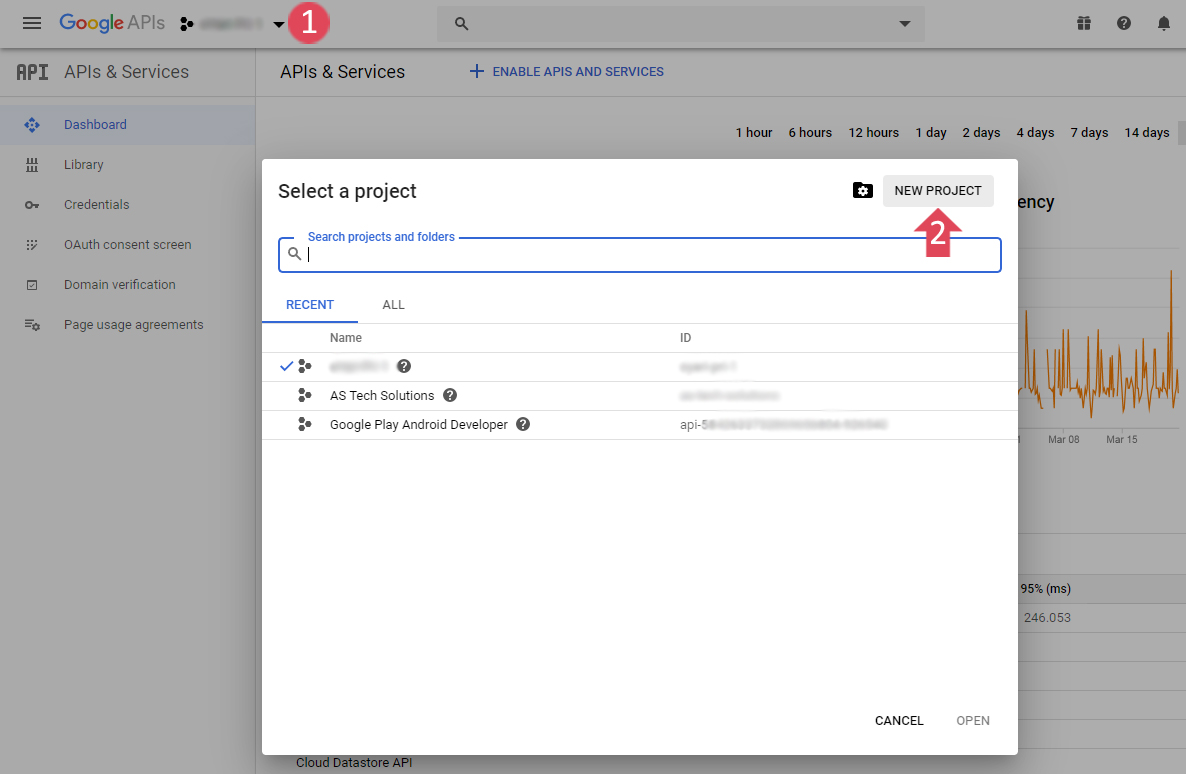
First of all, we need to create a project in the Google Developer Console. So login there using the given link. From the left of the top navigation menu, create a new project. After that, we require OAuth credentials.
Before you could create credentials to use for Google Sign-In, you have to configure the consent screen. So click to OAuth consent screen link from the left sidebar menu. If you’re making the website available to the general public, choose the External type. Otherwise, Internal type is enough.
For the External type of consent, mention the Application name and the logo. Further, the Support email will be the same as your Google developer account email id.
Google Sign-In into PHP Website – Scope & Domain
Scopes allow the application to access the user’s private data. If you need additional information apart from the email, profile and open id, the add the scope. For a Google login/register, the mentioned scopes are enough.
Fill the domain name you’re using to Authorised domains. A single project contains all domains belong to it, either it is an Android or web app or a Firebase project linked. Also, Google might create additional domains for you there, don’t delete them.
The domain name you’re adding here should be free from any protocol (HTTP/S). Also, you don’t need to add any localhost URL to this field. Google will identify such localhost requests automatically and respond.
Finally, add the Homepage link (fully qualified URL), Privacy Policy and Terms of Service links respectively. Then save the page and submit for verification. Until then you can test the application using the localhost.
Login Through Google – OAuth Credentials
Now click the Credentials menu from the left sidebar and open the page. There at the top middle, you will find the Create Credentials button. Hit this button and choose the OAuth client ID.
On the next page, select the Web application type. The Authorised JavaScript origins should be fully qualified domain names with protocol and www/non-www. These are useful when a webpage from your domain requests from Google in the user’s browser. Although we’re not using it yet you can add the domain if it is necessary.
Since we’re using server-side implementation, we have to provide Authorised redirect URIs. In our tutorial, we have the following URLs added:
http://localhost/HTDOCS_DIR/social/auth/
Replace HTDOCS_DIR with the name of the directory containing website files in the local installation.
Similarly, add the production site URL as well, for example, it could be https://www.yourdomain.com/social/auth/
Finally, once all done, download the JSON file from the list of OAuth 2.0 Client IDs. This file contains the client id and secret that we will use later.
Implementing Social Login and Register
Social login and register using Google or Facebook is an easy implementation through our tutorial. Get the next article with some PHP code in our application files. The good thing is you don’t need individual code for each social provider like Google Sign-In.
So stay tuned for the next article. Also, here we have left Domain Verification untouched. This is an essential part too in some cases. If you require then there is a similar article to verify site ownership.
Also, sometimes the website or the app fails to perform OAuth client verification. For that, we have a detailed article along with plenty of resources about the Google Sign-In procedure.
Thanks