You have noticed in the VPS setup guide that we need to use SSH to connect and manage servers. In this article, you will know what is SSH access, and how to use SSH with PuTTY. We will also secure SSH with key-based authentication.
This guide focuses on SSH server security as well. Hence I have added changing the SSH port and disabling login using username/password for better security.
- What is SSH
- Prerequisites before Using SSH
- Create a Server Profile on PuTTY
- Connecting to the VPS using Username and Password
- Securing the SSH Access with Key Based Authentication
- Improving Security with Disabling Username/password Authentication
- Change the Default SSH Port
- SSH Server Security – Final Words
What is SSH
SSH (Secured Shell) is a network protocol providing you access to remote servers. It ensures the secure transfer of information between two computers. SSH access is the way for us to connect and manage the remote server or Virtual Private Servers.
You’re already familiar with FTP (File Transfer Protocol). Also, you’ve used FTP clients like FileZilla to transfer files between your local computer and the remote server. A similar concept applies here.
What is SSH Client
Using an SSH client, we connect to the remote server and issue commands using a terminal or command-line interface. Shell is the actual program run by the operating system to process stuff entered into the command-line.
Modern Operating Systems like Windows 10 has built-in native SSH client namely “OpenSSH Client”. Similarly, macOS X has the “Terminal” client for the same. Also, there are free as well as paid SSH clients to download and use. These tools work with old OS like Windows 7.
These third-party clients give additional features. Like they offer a Graphical User Interface (GUI) to let you build and save server connection profile. So that you won’t need to type them each time on the console. Below are my two popular and free SSH client programs.
- PuTTY (Windows)
- Termius Basic (Windows, Mac)
Prerequisites before Using SSH
As stated previously, using SSH requires an SSH client. I have Windows OS and I use PuTTY to connect to my remote servers and VPSs. So I’m using it here in the article too.
Download PuTTYgen as well. We will use it later to generate the public and private keys set.
Installer packages as well as standalone executable binaries, both are available on the download page. I prefer to download executables, save them in a folder on the computer, and further use them without installation.
Additionally, When you buy a server, the web host provides you a set of credentials to let you begin. It includes:
- Username – It’s generally “root”.
- Password
- Server IP
- SSH port – By default, the port is 22.
I have a Virtual Private Server from vpsserver.com. You can get a server with a free trial for the first 7 days and as low as $2.99, payable per month thereafter.
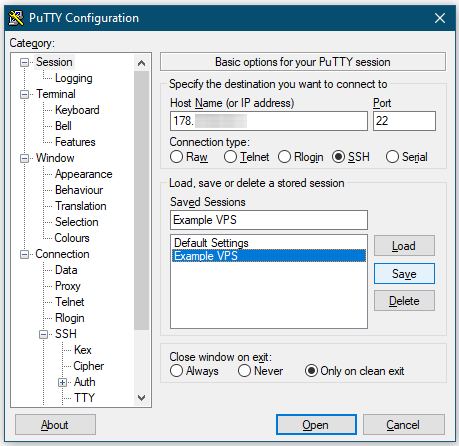
Create a Server Profile on PuTTY
Let us begin with creating a server profile in PuTTY. Open PuTTY by double-clicking its executable file. On the left side, there are various menus for settings. Whereas the right side has fields for each setting option. Initially, you see the Session settings in the PuTTY Configuration window.
Enter the server’s IP address in the Host Name field. 22 is the default port number for SSH service. If the web host provided another port then change it in the Port field. Also, choose the Connection type to SSH.
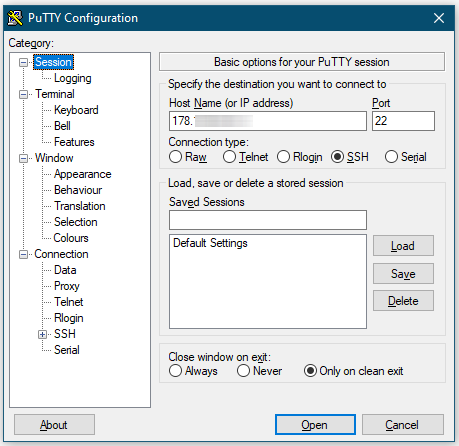
Now go to Connection → Data and input the username you have, in the Auto-login username field. I have “root”.

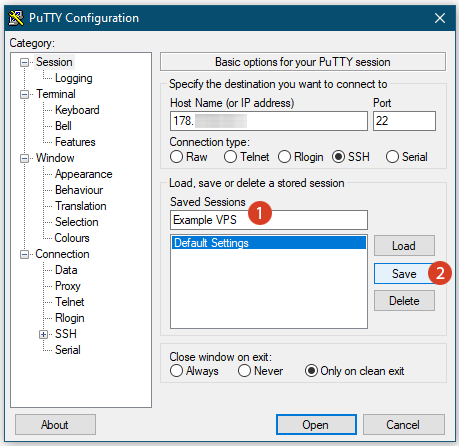
Go back to Session again. Enter a name in the Saved Sessions field that lets you easily remember for which server the connection is. I usually put main domain keywords. Like if example.com is the domain, I use “Example VPS”. Finally, click on the Save button.
I have a Username other than the root
Some hosts don’t provide the “root” username. Instead, they give another username with root privileges. If it is in your case then use that username instead of “root ” in PuTTY. Later run the following command.
1 | # sudo su |
The above command switches the current user to the root. In Linux, the root is the administrator user with maximum permission to do anything on the system.
Connecting to the VPS using Username and Password
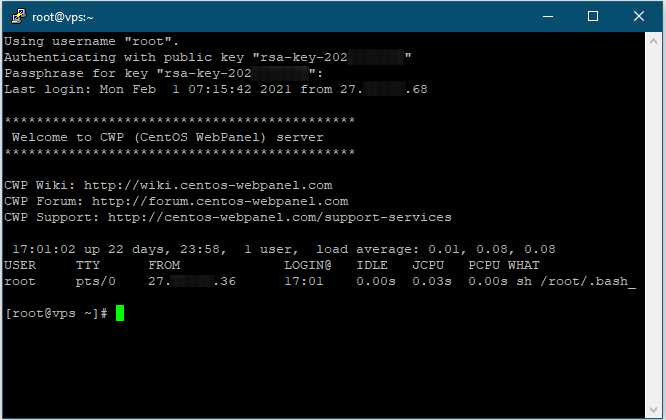
You have saved a session in PuTTY. This is like a profile or connection information for a server. The next time, you can simply select the desired connection from the Saved Sessions textarea in PuTTY, click on Load and then Open.
Following the steps mentioned above, connect to the SSH server you have recently added. Since you’re connecting to the very first time, it shows a security alert popup. Click Yes to add the host key into PuTTY’s cache and proceed.

If the alert appears again later on, means either another server is now running under the same IP address, or someone has broken in and changed the key.
The SSH console already has the username from the Saved Sessions so it displays the username and prompts for the password. Copy the password from your file and paste it there by right-clicking the mouse once. Alternatively, you can type the password as well.
Remember that the security feature of PuTTY won’t show you anything. It even won’t move the cursor while entering the password. Just write it and hit the Enter key on the keyboard. Congratulations! You have done the first time SSH login now.

Securing the SSH Access with Key Based Authentication
The previous one was a username and password-based SSH authentication system. Anyone else who knows the credentials can log in to the system too. This is a serious problem as hackers and bots consistently try to breach your server by guessing username/password and brute-force attacks.
We can minimize this risk using key-based SSH authentication which is far more secure than the traditional username/password login. This section describes what is an SSH key, how to create SSH keys as well as applying them on the server.
What is an SSH Key
SSH keys are a pair of encryption keys that are mathematically linked to each other, a public key and a private key. The public key encrypts a message whereas only the corresponding private key can decrypt that.
Thus an SSH key is an access credential in the SSH protocol and always comes in pair. The public key sits on the remote system and grants access to any user or device who has the corresponding private key, serving as a method for authentication.
Generate a Private/Public Key Pair
PuTTYgen is a tool to create an SSH key pair. Double-click the PuTTYgen executable file to open it. Ensure that it has RSA selected under the Type of key to generate. Also, 2048 should be there in the Number of bits in a generated key. Click on the Generate button now.

Move the mouse pointer over the blank area during the key creation process to generate some randomness.
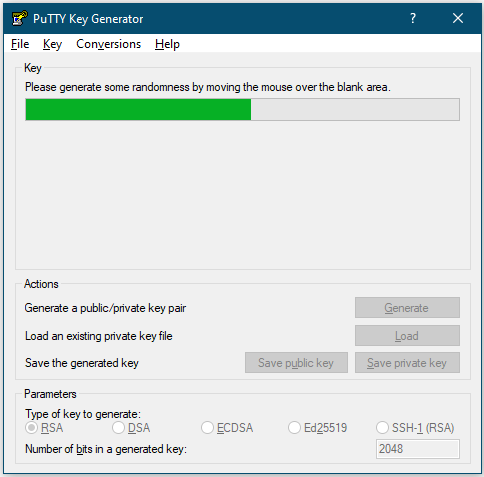
Now a private/public key pair has been generated. In the Key comment field, you can keep anything for your reference, just avoid any space.
The Key passphrase field adds an additional layer of security to the SSH protocol. While it is optional, I highly recommend using this. You will need this passphrase along with the key file each time you log in to SSH.

Enter a Key passphrase and repeat it under Confirm passphrase field. Then click on Save private key. Select a safe location on your computer and save the file with a name that lets you remember for which server it is. The file extension is “.ppk”.

We will post the public key on the server. I prefer to directly copy the public key from the PuTTYgen textarea and paste it on the server. However, you are free to save the public key in a file on your system if you want.
Just remember that sometimes copying the public key from a file doesn’t work as expected. It is because the text editor you use to open the file treats the content and end-of-line in its own way.
To save in a file, click on Save public key. You can save it in the same location as the private key. Then save the file either without an extension or a text file type like “.txt”.

Saving the Public Key on the Server
First, copy the complete key from the Public key from pasting into OpenSSH authorised_key file textarea of PuTTYgen. Alternatively, copy it from the public key file you saved previously.

There are mainly 3 ways to save the public key on the server. You can choose the one that suits you.
i ) Pasting into the Field Provided by the Web Host
Many web hosts offer their own panel to manage the basic activities of the server like start/stop, reload, scale, etc. Usually, they provide a field to save the public key as well. If it is there then you can paste the copied key and save it.
I personally prefer this method. Below is a screenshot from my virtual private server (VPS) by vpsserver.com web host.
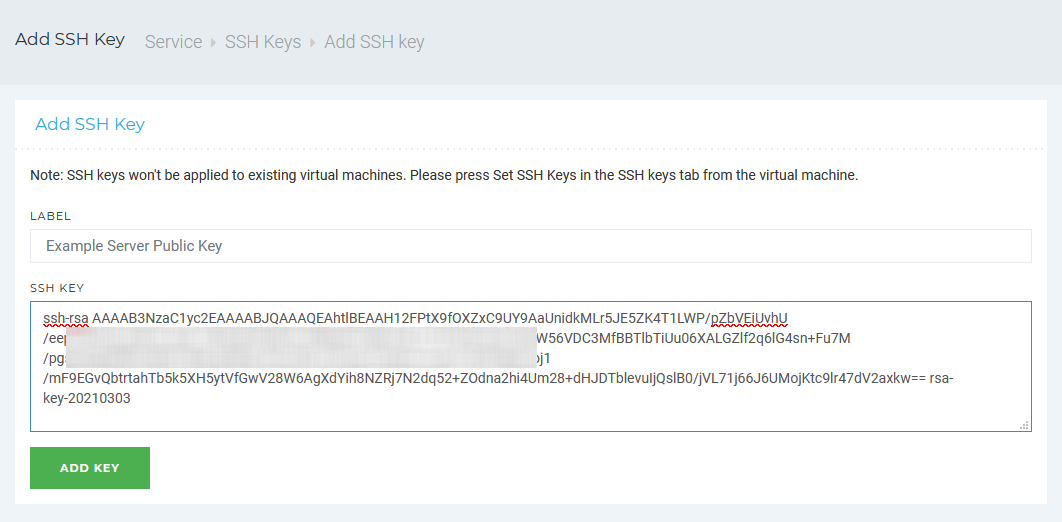
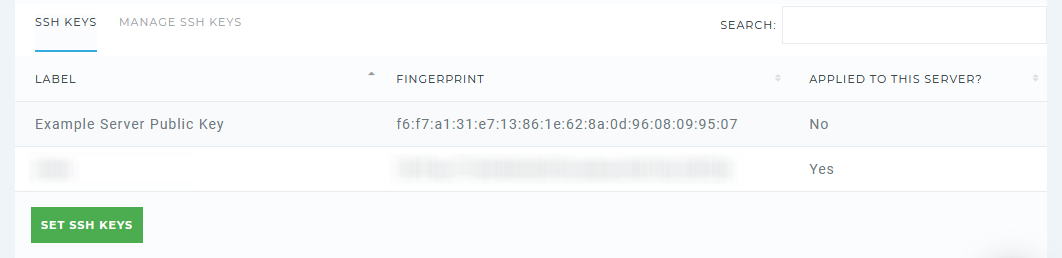
Further, specifying public key is not enough alone. You need to check if there is a key activation option as well. If it is there then set/activate the key for use.
ii ) Using your Hosting & Server Management Application
This is the application that you or the web host installs to let you manage the server and the hosting. cPanel, VestaCP, Plesk, Webmin, as well as CONTROL Web Panel, are such applications.
These applications provide a page to manage the server’s SSH keys. If there is such an option to import the public key and activate it then you can do that there too. For example, cPanel lets you import the key via SSH Security → SSH Access section.
Detailed guide to add and activate the private key in WHM/cPanel.
iii ) Save the Public Key via SSH Command
Reconnect to your server using PuTTY and run the following commands.
1 2 3 | mkdir ~/.ssh chmod 700 ~/.ssh vi ~/.ssh/authorized_keys |
Paste your public key in the editor, save the file and close the editor. Further, that file must be writeable/readable only by that user, so set the permissions.
1 | chmod 600 ~/.ssh/authorized_keys |
Here I used Vi, which is the default text editor that comes with most Linux systems. However, you can run any terminal editor (Nano, Vim) of your choice which is available on the server. Also, you should be familiar with the particular editor to properly add the public key in the file.
Finally, close the terminal once you have done it.
Attach the Private Key to the Server Profile in PuTTY
Now launch PuTTY again and load the connection profile of the SSH server to edit it.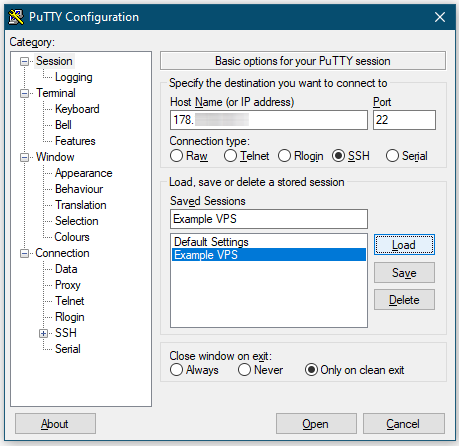
Then go to SSH → Auth and click on Browse.
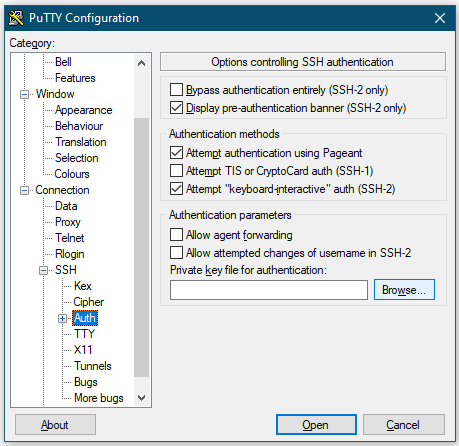
In the dialog box, go to the location where you have saved the private key and select it.

It will add the path to the private key file for the server connection profile.

Then go to Session again and click the Save button. It will attach the private key to the server’s profile in PuTTY.
Key-based SSH Login With PuTTY
After attaching the private key, you’re ready for the first key-based login to the server. As you can see in the previous screenshot, click the Open button to open a terminal window for SSH.
The system uses the public key for authentication and identifies it with the Key comment you provided in PuTTYgen. Further, it asks for the passphrase that was specified during the public/private key pair creation.

Recall that no cursor movement will take place when you enter the passphrase. Now you have successfully set up the Key-based SSH authentication to connect to the server.
I have the CentOS Web Panel installed on the Virtual Private Server. Here is the full guide to install CWP and make the VPS ready to server websites.
Improving Security with Disabling Username/password Authentication
At this point, the key-based as well as the username/password-based login, both are functional. So if a profile in PuTTY doesn’t have a private key attached, the system will prompt for username and password.
But disabling the log-in via username/password heavily improves the security of our server. So do it but only after you have the key-based authentication system added.
Here we need to tweak the values of a few parameters in the /etc/ssh/sshd_config file (not the ssh_config). You can edit this file using the terminal editor in the SSH session.
1 | vi /etc/ssh/sshd_config |
Alternatively, use the interface provided by the server management application like cPanel or Control Web Panel (CWP). In the CWP admin, this file can be accessed using the Service Config → SSH Configuration link.
Update the given parameters as follow using either method and save changes:
1 2 3 4 5 | [...] PasswordAuthentication no ChallengeResponseAuthentication no UsePAM no [...] |
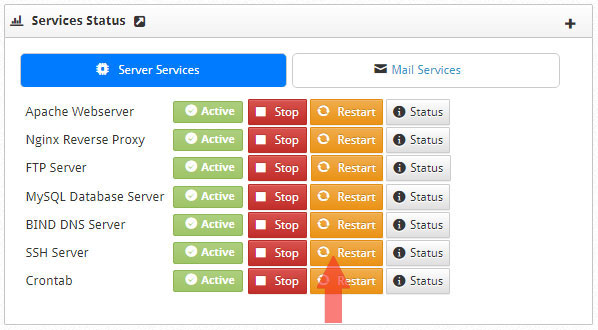
Now restart the SSH server using the interface given by the server management program. In CWP, it is the second Restart button from the last in the Service Status panel on the main page.
Alternatively, here are the commands to restart the SSH service via terminal:
1 2 3 4 5 6 7 | CentOS / RHEL / Fedora / Redhat Linux # service sshd restart Debian / Ubuntu # service ssh restart |
Now you won’t be able to log in anymore without a private key attached in the PuTTY SSH session.
Change the Default SSH Port
Changing the default SSH port 22 to something else is an effective weapon to defeat a majority of illegal authorization attempts. Since it tangles hackers to find the actual port.
Again in the /etc/ssh/sshd_config file, you will see line #Port 22. Remove the hash (#) and change 22 to 3088. Here 22 is the default port number for SSH service and I’m replacing it with 3088.
You can run SSH service on any other unused port having a number between 1024 and 65535. Also, the Service SSH → Netstat Port Usage page in CWP admin displays port numbers in use. Linux command for the same is netstat -tulnp.
Finally, restart the SSH service after changing the port number in the configuration file. It will lose the existing PuTTY session.
Reopen PuTTY and load the server profile. Change the Port in its settings and save it. Now you can connect to the server again.

SSH Server Security – Final Words
So here you learned about SSH and using PuTTY client to connect to the server. Also, you found how to create SSH keys. Further, we applied key-based authentication and disabled SSH login using username/password. At last, the article demonstrated how to change the default SSH port to something random.
Applying all of these practices combinedly gives fantastic security to the SSH server. Mostly, hackers don’t waste their time in guessing the right port, not they touch a server available with only key-based authentication.
Hope this article helped you understanding this SSH concept, proficiently using it as well as hardening its security. Did you find it useful or have questions? Don’t forget to share and update me with your comments.