It’s a good idea to develop a WordPress site locally as it can boost up the speed of development. Moving WordPress site from localhost to live server after finishing the development on the localhost isn’t hard work. This article involves steps to transfer WordPress to a web server.
After reading this article, you would be able to migrate all of your content (posts, pages, images, etc), themes, as well as plugins from local server to a production site.

Before we start, I would like to inform you that there are plugins available to do this migration from local server to live site still they are either available at a cost or required much technical knowledge for Moving a WordPress site from localhost to live server (indeed at your own risk).
Pre steps requirements:
- A WordPress site running on local server and your full access to the local server
- A web hosting to support WordPress, to migrate your content over there.
- An FTP program (like FileZilla) and knowledge regarding how to use FTP, so you can upload your content to the live site.
1: Upload WordPress site to live server using FTP
Open the FTP program and connect to your live site. After a successful connection, upload the files in the right directory at the server from your local folder. If you are using cPanel then files will be transferred to the public_html folder (in single domain hosting). On a multi-domain hosting account, it will be usually a corresponding folder in public_html pointing to your site.
So while files are being uploaded, let’s prepare our database meanwhile.
2. Export Local WordPress Database
Open your browser, type phpMyAdmin URL which is usually http://localhost/phpmyadmin and go to your database inside that. Next, click on the Export button from the top menu bar. Choose custom from the Export Method option.
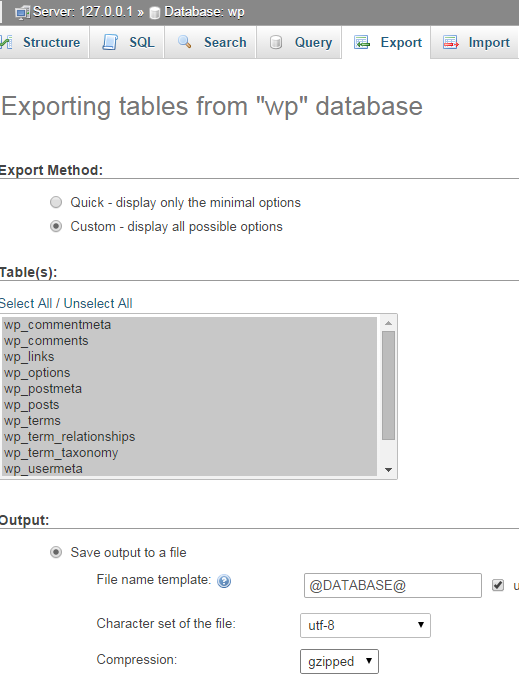
Select all tables to export and gzipped for compression. Scroll down to the bottom of the page and press the Go button to download your database. Your database has been downloaded. The next two steps involve creating MySQL database for production and importing & adjusting this downloaded WordPress database there.
3. Creating a MySQL database for production
To create a MySQL database, login to your cPanel dashboard which is provided by most of the WordPress hosting providers. Under the databases section, click on the MySQL Databases icon.

In the next screen, create a database for your WordPress site, followed by scroll down to MySQL users section and create or add an existing user to the database. Grant all privileges to the user in upcoming window where cPanel takes you to set MySQL privileges for that user after adding the user.

4. Importing WordPress Database
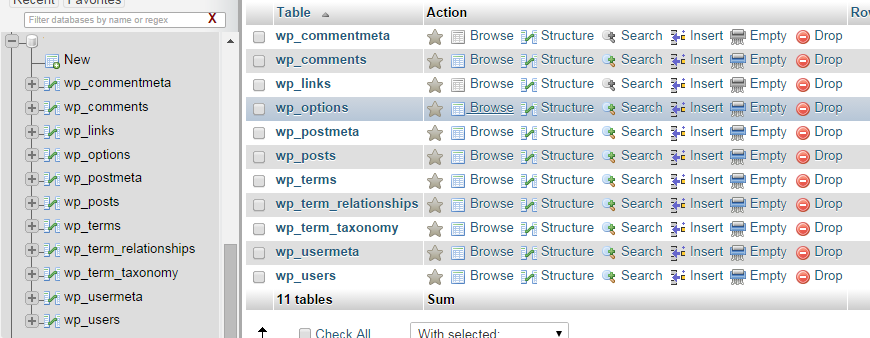
Continue with cPanel, go back to dashboard and again scroll down to the databases section and click on phpMyAdmin icon. This will open a new tab/window and and there will be phpMyAdmin in front of you. On the left pane click the database name you just created for your WordPress site and on the right side phpMyAdmin will show your new database with no tables.
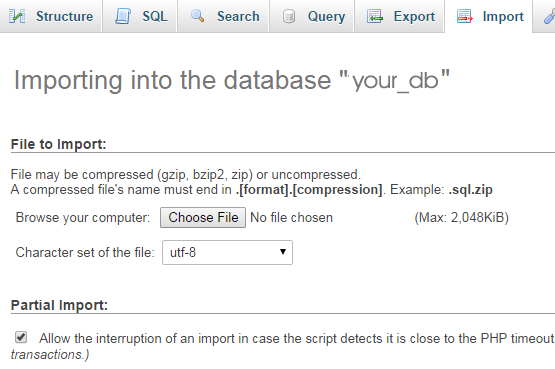
Click on the Import tab in the top menu. On the import page, click on choose file button and then select the gzipped database file you saved in step 2. At the end there will be Go button, pressing this will let phpMyAdmin import your WordPress database.
5. Update siteurl and home
You need to change siteurl and home at a part of moving WordPress site from localhost to live server. To accomplish this, look for the wp_options table in your database that we just imported in previous step (be aware, if you changed database tables prefix, then it will be {prefix}_options). Click on the browse button for this table on right side.
Under the field options_name, you need to look for siteurl. Click the Edit Field icon available at the far left at the beginning of the row. You can either click Edit and update siteurl with your new domain name and hitting Go button at end of page (something like from http://localhost/test to http://www.yourdomain.com) or can directly update by double clicking the option_value field for this row carefully.

Update the value for home option_name field to be the same as your siteurl. The table may have many records so move to second page or increase number of rows to show using dropdown given below table to find home option_name.
6. Updating database credentials
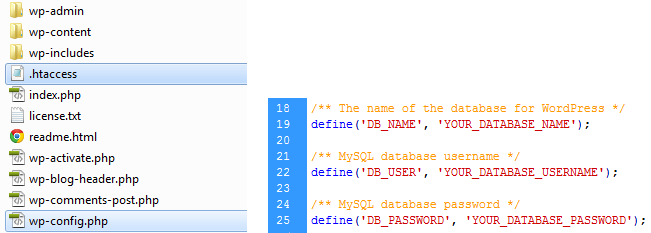
After importing the database, and all of our content should be uploaded. Now configure WordPress with new database credentials you have. Use your ftp client and connect to your website and edit wp-config.php file which is placed at the same level as wp-content and wp-includes (if you didn’t change default WordPress installation). Provide the database name, username and password you created earlier in Step 3. Save the wp-config.php file and upload it back to your server.
Visit your website, and it should be live now. If yes then CONGRATULATIONS! else don’t worry and follow step 7.
7. Configure .htaccess and permalinks
If your site is failed to start properly then have a look at .htaccess file situated at same level as wp-config.php (create one new if not present). Modify this file to match entries as given below:
1 2 3 4 5 6 7 8 9 10 11 | # BEGIN WordPress <IfModule mod_rewrite.c> RewriteEngine On RewriteBase / RewriteRule ^index\.php$ - [L] RewriteCond %{REQUEST_FILENAME} !-f RewriteCond %{REQUEST_FILENAME} !-d RewriteRule . /index.php [L] </IfModule> # END WordPress |
If your permalinks are not working or encountering page not found error then you might need to update permalinks again. Follow this tutorial to update permalinks.
8. Updating paths to Fix missing images & broken links
Migration of WordPress sites cause you to fetch with broken links and missing images issue. You have to run the query below on your WordPress database to fix these issues. Select your database in phpMyAdmin and click on SQL from top menu. Run this query while replacing your local site url and live site url.
1 | UPDATE wp_posts SET post_content = REPLACE(post_content, 'localhost/test/', 'www.yourdomain.com/'); |

Now your site is live and up! For troubleshooting and questions feel free to leave us a comment below and we will try to help you out.