Connect android app to localhost over Wi-Fi and it gives a lot of flexibility to develop, run and test the app. My scenario was that I had created an android app which had a need to access my local web server (XAMPP) for faster testing and the application was running on the device as well as an emulator.
You might be using either PHP + MySQL or C# + MSSQL on Apache/IIS Server respectively. And you need to code and test your app before moving them to production. You can access or connect the android app to the local web server over Wi-Fi, without the need of internet connection. It saves you from waiting for the response from a remote host or your live server.

Check some excellent articles for easier PHP development.
Connect Android App – is Local Server ready?
I believe that you have already set up your localhost and files to serve the request being received from the device. Ensure that your local server is accessible (type http://localhost/ in your PC’s browser and get a response).
Just FYI, the article is intended to answer the following similar questions as well:
- Test local website on a mobile device
- Run android app against a localhost API
- How to access localhost from a mobile browser
- How to access localhost from Android over Wi-Fi
- Connecting android app to your WAMP/XAMPP server
- Connecting to localhost web server from android application
Connect Android App to Localhost Over Wi-Fi
Simply typing localhost or http://127.0.0.1 in your app code won’t work. You need to obtain the IPv4 address of your PC/server. If you’re using Windows PC, you can follow these steps to find the IPv4 address:
- On Start menu, type
cmdto open Command Prompt. - Run
ipconfigcommand there. - You will get the IPv4 address as highlighted in the image below.

As you can see my IPv4 address is 192.168.1.110. However, you might be worrying, do each time I need to check IP? No, absolutely not. Let me share you three facts.
- Generally, it’s needed to check only when your router gets reset.
- In my case, I had set IP address pool range in my VDSL modem and I’m getting the same address for my local server since years regardless of PC/router restart. I have mentioned how I did it to connect the android app to localhost running on my computer.
- The third is, routers/modems give you the option to reserve the IPv4 address for the specific device and you can assign fixed IP to your local server.
So fix once and always use that IP to access localhost from a mobile browser as well as your app.
Set up IP Pool Range in VDSL for Lasting Server Address
This step is optional and based on my personal experience. You generally don’t need it. Try only if your IPv4 address varies too much. Also, note that these are general instructions only and might vary from router to router.
- In your PC/laptop access http://192.168.1.1 and enter adequate credentials.
- You will have your router configuration page.
- Find the DHCP Server Settings page there.

On this page, set IP Pool Range and save changes. An IP Pool Range is a set of IP address range used by your router/modem to assign IPs to connected wired or wireless devices. Finally, don’t forget to restart the local server to take effect.
This page also shows you the list of connected devices along with their Mac Address. We will use it if this pool range setting doesn’t work for you.
Assign Fixed IP to Your Local Server and Access it in Mobile

Lastly, you can assign a permanent IP address to your local web server if above is not sufficient. Find DHCP Reserved or DHCP Static IP Configuration page in router configuration pages. You need to have Mac Address of localhost PC. Also, there is plenty of information available on the internet to find Mac Address of a device.
Give one desired IP address from range 192.168.1.2 to 192.168.1.255 (192.168.1.1 is normally the address of the router itself). Specify Mac Address (without colons if instructed) of local web server machine and save it. Restart your machine; confirm address using ipconfig command and you’re done.
Access Your PC/Localhost from Android Code
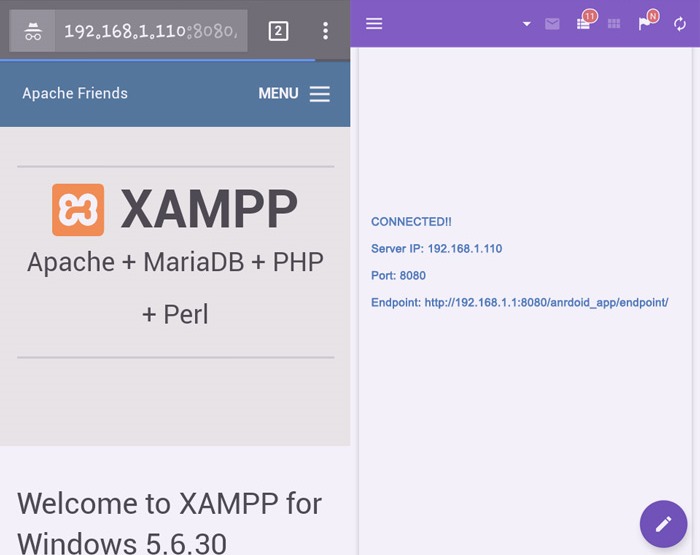
Till here, you have a stable IP address for your server. Now it’s time to use the address in android code. However, first try to connect android browser with the server using URL http://192.168.1.110 (or your localhost URL along with port no if using any rather than the default 80). You will see a response from the server.
Now for the app to test, ensure your app has internet access permission. Open AndroidManifest.xml file and add the following line if it does not exist:
1 | <uses-permission android:name="android.permission.INTERNET" /> |
Next in your class file, use the IP address of local web server explicitly, not the term localhost. For a PHP + MySQL set up, it would be IP address followed by a path, something like:
1 2 3 4 5 | //Change url as per your project setup. //Use IP address, not localhost or 127.0.0.1. //Also remove port no if it's not required String url = "http://192.168.1.110:8080/project/endpoint.php"; |
Further reading: Best way to set up debug and release environments.
Regardless of you’re testing the app either using USB debugging or Android Emulator, you can connect the android app to localhost over Wi-Fi to develop, run and debug without using the live server. The same is true to access localhost from the mobile browser.